
 Connexion

Archive
Tous les articlesJuillet 2026Juin 2026Mai 2026Février 2026Janvier 2026Décembre 2025Octobre 2025Septembre 2025Juillet 2025Octobre 2024Juin 2024Février 2024Janvier 2024Novembre 2023Octobre 2023Août 2023Avril 2023Mars 2023Février 2023Janvier 2023Décembre 2022Juillet 2022Mai 2022Mars 2022Décembre 2021Novembre 2021Octobre 2021Septembre 2021Août 2021Juillet 2021Juin 2021Mai 2021Avril 2021Mars 2021Février 2021Janvier 2021Décembre 2020Novembre 2020Octobre 2020Juillet 2020Mai 2020Avril 2020Mars 2020Février 2020Janvier 2020Octobre 2019Septembre 2019Juillet 2019Mars 2019Février 2019Octobre 2018Septembre 2018Août 2018Juillet 2018Juin 2018Mars 2018Février 2018Janvier 2018Décembre 2017Novembre 2017Juillet 2017Juin 2017Avril 2017Février 2017Janvier 2017Août 2016Juin 2016Février 2016Novembre 2015Octobre 2015Septembre 2015Juillet 2015Juin 2015Janvier 2015Novembre 2014Octobre 2014Septembre 2014Août 2014Juillet 2014Juin 2014Mai 2014Avril 2014Février 2014Janvier 2014Octobre 2013Septembre 2013Juillet 2013Février 2013Octobre 2012Septembre 2012Mai 2012Janvier 2012Novembre 2011Juillet 2011Février 2011Janvier 2011Décembre 2010Octobre 2010Avril 2010Février 2010Janvier 2010Septembre 2009Mai 2009Février 2009Janvier 2009Juillet 2008Décembre 2007Septembre 2007Juillet 2007Avril 2007Avril 2006Mars 2006Novembre 2005Mai 2005Octobre 2004Août 2004Juin 2004Mai 2004Avril 2004Mars 2004Décembre 2003Mai 2002Novembre 2000How to Replace an Evolis Print Head
- Always print a Technical Test Card before removing an old print head. This card must be sent inwith any head being evaluated for warranty replacement.
a. This can be done by going to the Start Menu on your computer => choosing “Control Panel” => choosing “Printers and Faxes” => right click on the Evolis printer and choose “Properties”. Then click on the “Tools” tab and click STT card or Technical Test card. A card and ribbon must be present to run this card.
- After the Technical Test Card is printed, unplug the power from the printer. Open the hood and remove the print head. This can be done by pressing against the back metal spring loaded plate with one hand and twisting the print head out with the other. The print head should release easily and require little or no force.
- Then remove the wire connecting the print head to the printer. The wire to remove is the one going into the print head. Simply, pinch the wire with your fingers and pull.
- Now you can connect the new print head wire and insert the print head into the printer. You should hear a “click” as you insert the new head and press it into place.
- Now you must align the new print head number with the printer. Failure to do this will void warranty and can cause the print head to fail. Start in the printer driver under the “Tools” tab (instructions on getting to the driver in section 1a).
- Click on “Dialogue with Printer”. Here you will see a command box. You will need to enter the command: “Pkn;” followed by the new print head number and then press enter on your computer.
a. Example: Pkn;265‐B9200852‐B
- If the command was inputted properly you will get a cleaning light blinking on your printer. You can now remove the ribbon and cards and insert a cleaning card. Press the white lit button on your printer and it will automatically run a cleaning cycle. Your print head is now installed properly.
- The old print head and Technical Test card must both be submitted for any warranty credit to be received.
Tag: evolis, print head
Favoris des clients
Printhead Replacement Kit - Evolis Zenius & Primacy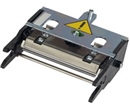
$679.00$938.00